Category Archives: Food
Fast & Easy Garlic Dill Pickled Green Tomatoes – #TastyThursday
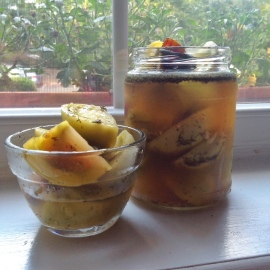 The last few #TastyThursday and #ScrumptiousSunday posts have been centered around unripened green tomatoes, and today I wanted to bring one last amazing recipe using what many people find useless. How about some garlic dill pickled green tomatoes? For some reason I find that some folks are intimidated by doing home pickling – when there’s really not much effort in it! Home pickling is not only more tasty, but it’s incredibly cheap as well. When it comes to picking anything – the only limits are the lack of imagination!
If you’re anything like me, your taste buds do backflips for pickled veggies! The most tedious aspect to any pickling process is waiting, but who says you have to wait? This recipe (which you can use most anything other than green tomatoes) will give you ready to eat pickled green tomatoes in under an hour…or a few hours if you want them chilled.
- 12-18 green tomatoes (about 3 lbs)
- 2 cups white vinegar
- 2 cups water
- 2 tablespoons pickling salt
- 4 heads fresh dill or 4 teaspoons dill seeds
- 4 small cloves garlic
- 4 pint size canning jars
Prepare canning jars. Slice all the green tomatoes in half. Combine vinegar, water, and salt in a pot and bring to a boil.
Place 1 head fresh dill or 1 tsp dill seeds and 1 clove garlic into each jar; pack in green tomatoes. Pour boiling vinegar mixture over green tomatoes to within 1/2 inch of rim (head space). Process for 15 minutes.
Garlic may turn blue or green in the jar. Nothing to be alarmed about, it is only the effect of the acid on the natural pigments in the garlic.
That’s it!
Tip: For more garlic flavor, add an extra clove! For a little kick, add some chilli peppers. We added jalapeño and banana peppers.
Live Well – Eat Well – Be Well
Fried Green Tomatoes – #ScrumptiousSunday

Add some homemade spicy-mayo and artificial bacon bits to your fried green tomatoes to kick it up a notch!
You say tomato, I say tomahto…we both say delicious! This past #TastyThursday I mentioned our abundance of ripe and green tomatoes in our last harvest from the garden, and I said I would post some more delicious recipes using green tomatoes such as Green Tomato Bread recipe. Today I give you Fried Green Tomatoes!
There’s a debate about where fried green tomatoes actually originated from. Some say the South and others say the Midwest. When my German/Russian family immigrated to the United States, the majority of them settled in the Midwestern states…Iowa, Minnesota, and Illinois. I grew up on many delicious dishes such as Fried Green Tomatoes, each recipe carrying with it a long story of where/who it originated from. Being that most American hadn’t even heard of the idea of battering such un-ripened fruit and frying it in a well seasoned cast iron skillet until the 1991 classic film, Fried Green Tomatoes, the Midwest theory really pans out. I also did some in-depth online reading, and I hate to burst the bubble of some, but Fried Green Tomatoes are by no means a Southern dish…the accurate debate is whether they’re originally Midwestern or Northeastern! But enough of about where they came from as we can all agree that they should be enjoyed by everyone!
For the Fried Green Tomatoes
- 6 – 8 firm green tomatoes
- 3 cups all-purpose flour
- 2 cups of seasoned bread crumbs
- 2 cups of almond or soy milk
- 2 Tablespoons cayenne pepper
- 1 Tablespoon sea salt
- 1 teaspoon black pepper
- 1/2 cup canola oil
Slice green tomatoes to medium thickness and sprinkle lightly with salt, let stand for 5 minutes.
Prepare your dredging bowls: In the first bowl, add almond or soy milk. In a second bowl combine and mix all-purpose flour, cayenne pepper, sea salt, and black pepper. In a third bowl, add bread crumbs.
Dredging Method
- Dip each green tomato slice in the almond or soy milk.
- Coat it in all-purpose flour mixture.
- Dip once again in the almond or soy milk.
- Coat in seasoned bread crumbs.
- Gently stack on a plate and set aside.
Heat oil in skillet on medium-high. To test, drop a tiny piece of bread crumb in oil. It should immediately crackle when ready.
With tongs gently place each dredged green tomato slice in hot oil. Be sure not overcrowd. Fry 3-5 minutes on each side or until golden and crispy. When done, remove green tomatoes and gently place on a paper towel lined plate. Sprinkle lightly with sea salt.
Spicy-Mayo Sauce
- 3/4 cup Vegenaise®
- 1/4 cup water
- 1 Tablespoon yellow mustard
- 1/2 teaspoon salt
- 1 teaspoon chilli powder
Whisk all ingredients together with a fork in a small bowl. Drizzle over fried green tomatoes. For some added flare, sprinkle with artificial bacon bits!
Live Well – Eat Well – Be Well
Green Tomato Bread – #TastyThursday
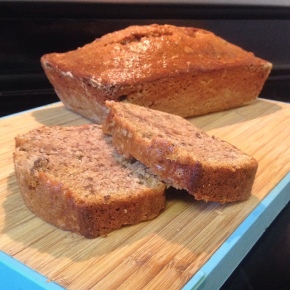
A perfect and unique fall bread – great for brunch or a quick breakfast with coffee or tea. These tasty loaves make great gifts for friends and neighbors too!
This year we’ve been kissed by the tomato Gods! We’ve probably had over 250 ripened tomatoes from our garden and we just did our last harvest this week. Given that fall is making itself known – we had over 3 dozen green tomatoes which needed clipped as the days are already too short (lack of sun) and the nighttime temperatures have noticeably cooled to temperatures that tomato plants are not fond of.
There’s no need to fret over an abundance of green tomatoes though! Green tomatoes (which are not fully ripened) can be just a delicious as the bright red fruit, given that you know what to do with them. So don’t worry about paper bagging your green tomatoes or God forbid, throwing them out…as I will dedicate the next few #TastyThursday and #ScrumptiousSunday posts to some of our favorite recipes using green tomatoes. Today I give you: Green Tomato Bread! This delicious bread has the familiarity of zucchini or banana bread, with the unique and tasty cut from the high acidity of green tomatoes. Oh, and it’s easy! Bon Appétit!
- 3 cups all-purpose flour
- 1/4 teaspoon baking powder
- 1 teaspoon baking soda
- 1 teaspoon salt
- 2 cups sugar
- 1 Tablespoon cinnamon
- 1/2 cup banana, purée
- 1 cup vegetable oil
- 1 teaspoon vanilla extract
- 2 cups finely chopped green tomatoes
- 1 1/2 cups of chopped pecans
Preheat oven to 350 degrees.
Combine the first 6 ingredients in large bowl. Make a well in the center of mixture.
Combine the banana, oil, and vanilla; stir well. Add to dry ingredients and stir just until moistened. Fold in the tomatoes and pecans.
Spoon the batter into 2 greased and floured 8 1/2 by 4 1/2 inch loaf pans. Bake at 350 degrees for 1 hour or until toothpick inserted comes out clean. Cool in pans on wire rack for 10 minutes, then remove and cool completely on wire rack. Enjoy!
Live Well – Eat Well – Be Well
Macaroni & “Cheese” – #ScrumptiousSunday
It has been so exciting to receive so much encouragement and feedback in such a short time since I launched The Vegan Bear! My passion for the vegan lifestyle, the eagerness in learning to write decently as an amateur, and each and every one of you who follow me make this blog so much fun! One of the most popular requests I’ve received since I started is for more recipes, so your wish is my command! I will now start posting recipes on Thursdays and Sundays. My #TastyThursday posts will be recipes for pretty much everything – salads, sandwiches, main dishes, sides, and desserts. My new #ScrumptiousSunday posts will be solely dedicated to those recipes that are so proper for Sundays cooking. These are dishes, desserts, and meals that might mimic a popular and traditional dish that many of us grew up with (vegan, of course), or a recipe that is so scrumptious, hearty, and carries the worthiness of being a Sunday best.
 I hereby christen #ScrumptiousSunday with one of my all-time favorite recipes: Sister Kitsiyah’s Macaroni & “Cheese”! This is one of the most popular dishes at Everlasting Life Cafe (soon to be Woodland’s Vegan Bistro). For those of you who don’t already know, this is absolutely my favorite place to eat in the entire Washington, DC area. This award-winning restaurant and their food truck offer the perfect variety of 100% vegan, gluten-free soul food. Yes…vegan soul food! Sister Kitsiyah, is a health food nutritionist who studied vegan cooking in Israel with the African Hebrew Israelite Community. This recipe for macaroni and cheese is from her Food for Life Cookbook. Many of my non-vegan friends even assert that this Macaroni & “Cheese” recipe is top-notch and some even say its better than their grandmother’s! The only thing better than its satisyfing taste is the easiness in making it. Once you make your first batch, be sure to leave a comment on this post and let me know what you think!
- 16 oz. bag/box of elbow macaroni
- ½ cup + 1 Tablespoon nutritional yeast
- 2 teaspoons of Spike seasoning
- 1 ½ cups soy milk
- 1 garlic clove
- ½ teaspoon sea salt
- ½ teaspoon paprika
- ¾ cup canola oil
Preheat the oven to 350 degrees.
Cook the pasta as directed. In a blender or food processor, blend the nutritional yeast, Spike seasoning, soy milk, garlic and paprika. Slowly pour the oil in the food processor while it is running. The mixture should be creamy, as this will be the “cheese” sauce.
Strain the pasta and run cold water over it. Be sure to shake all of the excess water out of the pasta. Put the pasta back in the pot and mix it with about 1 cup of the “cheese” sauce. Put the cheesy noodles in an oven casserole dish (I use a 7 ½ x 12 inch casserole dish). Pour the remaining cheese evenly over the noodles.
Sprinkle with paprika and cook in the oven for 25 minutes or until golden brown. Remove from oven and let stand for 30 minutes before serving. May your Sunday be scrumptious and cheesy…in all the good (vegan) ways. Enjoy!
Cinnamon Swirl Bread – #TastyThursday
 This is one of many delicious recipes from one of my favorite vegan recipe books, Hearty Vegan Meals for Monster Appetites. What I love some much about this recipe is that it’s completely versatile. Serve it with some marmalade for an amazing brunch or enjoy it warm after dinner with a generous scoop of your favorite vegan vanilla ice cream.
The name “Cinnamon Swirl Bread” is a little deceiving as this is more like a sticky, gooey, old-fashioned cinnamon roll…which is probably why I like it so much! So be sure to serve it with a fork, and try it with raisins and/or nuts for some added awesomeness!
For the Dough
- 1 cup soymilk, heated to lukewarm
- 1/4 cup water, heated to lukewarm
- 1/3 cup evaporated cane juice or granulated sugar, divided
- 1 1/2 teaspoon active dry yeast
- 2 Tablespoons plus 1/2 teaspoon vegetable oil, divided
- 3 cups all-purpose flour, plus more if needed
- 1/4 cup vital wheat gluten flour
- 1/2 teaspoon ground cinnamon
- 1/4 teaspoon salt
For the Swirl
- 1/3 cup packed brown sugar
- 2 teaspoons ground cinnamon
- 3 Tablespoons nondairy butter, melted
To Make the Dough
 Combine the soymilk, water and 1 tbs of the sugar in a small bowl. Stir in the yeast and let sit for a few minutes until bubbles appear. Add 2 tbs of the oil to the mixture.
In a large bowl, combine the flours, cinnamon, remaining sugar, and salt. Stir the wet ingredients into the dry, mixing until combined.
Turn out onto a lightly floured surface and knead for 8 minutes, until the dough is smooth and pliable, adding more flour as needed if the dough is too sticky. This is a dry, stiff dough, but it should still be workable.
Lightly coat a large bowl with the remaining 1/2 tsp oil. Place the dough in the bowl and gently turn to coat. Cover tightly with plastic wrap and let rise until doubled in size, 60 to 90 minutes.
To Make the Swirl
 Combine the swirl ingredients into a paste and set aside.
Gently deflate the dough and place on a lightly floured surface. Knead for 3 to 5 minutes.
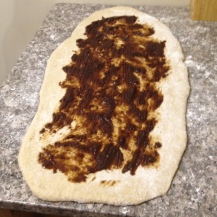
Roll the dough into a rectangle 8 inches wide by 24″ long. Spread the cinnamon paste thinly and evenly onto the dough. Starting at the short end, tightly roll up the dough. Cut into 2 separate loaves. Place the rolled-up dough, seam side down, into an 8×4 inch loaf pan. Let rise for 30 minutes.
Preheat the oven to 350. Bake for 25-30 minutes, or until the outer crust is golden brown and hard to the touch. Let cool on a wire rack before slicing.
Alternative: press down 1/2 cup raisins and/or 1/2 cup chopped pecans into the rolled out dough.
Tasty Thursday – Chocolate Avocado Cake
I’m sure a few you have one eyebrow raised as you read the name of this recipe with skepticism. Let me reassure you, this is to die for!
Now don’t get me wrong…this is not a low-calorie cake by any means, but it’s vegan! And we need to remember that we’re allowed to indulge in the incredibly sweeter things in life, in moderation of course.
The unique thing about this cake is that avocado is not only baked into the chocolate cake itself, but it’s also one of the main ingredients in the rich buttercream frosting as well. I will tell you that the key to making this cake a success is fully RIPE avocados! If you’re avocados are not yet ripe, be sure to put them in a paper bag and wait…patience is everything!
For the Cake
- 3 cups all-purpose flour
- 6 Tablespoons unsweetened cocoa powder
- 1/2 teaspoon salt
- 2 teaspoons baking powder
- 2 teaspoons baking soda
- 2 cups granulated sugar
- 1/4 cup almond oil (vegetable oil would work too)
- 1/2 cup soft avocado, well mashed (about 1 medium avocado)
- 2 cups water
- 2 Tablespoons white vinegar
- 2 teaspoons vanilla extract
Preheat oven to 350 F. Grease and flour two 8 or 9-inch rounds and set aside.
Sift together all of the dry ingredients except the sugar. Set that aside too.
Mix all the wet ingredients together in a bowl, including the super mashed avocado. Add sugar into the wet mix and stir. Mix the wet with the dry all at once, and beat with a whisk (by hand) until smooth.
Pour batter into a greased cake tins. Bake for 30 to 40 minutes, until a toothpick inserted comes out clean. Let cakes cool in pan for 15 minutes, then turn out onto cooling racks to cool completely before frosting with avocado buttercream.
For the Avocado Buttercream Frosting
- 8 ounces of avocado meat (about 2 small to medium, very ripe avocados)
- 2 teaspoons lemon juice
- 1 pound sifted powdered sugar
- 1/2 teaspoon vanilla extract
Peel and pit the soft avocados. Again, it’s important to use the ripest avocados you can get your hands on! If the avocados have brown spots in the meat, avoid those spots when you scoop the meat into the bowl.
Place the avocado meat into the bowl of a stand mixer fit with the whisk attachment. Add lemon juice and whisk the avocado on medium speed, until slightly lightened in color and smooth, about 2-3 minutes. Add the powdered sugar a little at a time and beat. Add vanilla extract until combined.
Garnish with some fresh fruit, I used strawberries. If not using right away, store in the refrigerator. Don’t worry. It won’t turn brown!
Fig Galette – #TastyThursday
It’s fig season!
Get figgy with it!
Tis the season to be figgy!
British cookery writer Elizabeth David once said, ““To eat figs off the tree in the very early morning, when they have been barely touched by the sun, is one of the exquisite pleasures of the Mediterranean.”
I love figs! I love eating fig off the tree!! I love fig preserves, seared figs, fig pastries, figs in salads, poached figs, and so on. Here’s one of my favorite and very simple fig recipes! Bon Appétit!
For the Crust:
- 1 1/2 cups all-purpose flour
- 2 Tablespoons sugar
- 1/2 teaspoons salt
- 1/2 cup cold vegetable shortening
- 4 Tablespoons ice water
- 2 teaspoons apple cider vinegar
For the Filling:
- 1 1/2 lbs mission figs (tips cut off and discarded quartered)
- 1/4 cup orange marmalade
- 2 Tbsp sugar
For the crust: Combine the sugar, flour, and salt in a bowl. Using a pastry cutter (or your clean hands) cut in the shortening to the mixture until coarse crumbly dough is formed.
In another small bowl, combine the ice water with the vinegar. Drizzle 1/3 over the water over the flour mixture and stir. Drizzle another 1/3 over the mixture and stir again. Drizzle the rest of the water over the dough and form a soft dough ball. If the mixture hasn’t come together, add another tablespoon of ice water. If it’s too wet, add a tablespoon of flour. Pat dough into disc shape. Wrap the dough in plastic wrap or parchment paper. Let sit in the fridge for an hour.
Preheat oven to 375 F. Roll out dough to a 14-inch diameter round of even thickness. Place on a parchment or lined, rimmed baking dish.
Spread marmalade on the rolled out dough, leaving a 2-inch border along the edges. Arrange the quartered figs in a circular pattern, again leaving a 2-inch border. Sprinkle sugar over the figs.
Fold the 2-inch bordered edge of the crust over the figs, pleating the crust.
Place in the middle rack of the oven. Bake at 375°F for 45-50 minutes, until the crust is lightly browned and the fruit is bubbly.
Remove from the oven and let cool for 30 minutes. Enjoy!
Piele Style Mashed Sweet Potatoes – #TastyThursday
The word is a wonderful place, partly due to delicious sweet potatoes! There’s a gazillion and one ways to prepare them, and mashing them up into thick, creamy goodness is never a bad thing. The key to good mashed sweet potatoes is remembering we’re not making a sugar loaded, Thanksgiving style sweet potato casserole or soufflé. With this dish, it’s all about simple…concentrating solely on the tastiness and natural sweetness of the sweet potato. This three-ingredient dish, known as piele in Hawaii, is fabulously simple. Coconut milk—an occasional indulgence because of the saturated fat—contributes rich flavor. Be sure to try this simple recipe for your next dinner, picnic, or potluck! Have a “sweet” Tasty Thursday!
- 1 1/2 pounds sweet potatoes, (about 3 medium)
- 3/4 cup “lite” coconut milk
- 1 tablespoon fresh minced ginger
- 1/2 teaspoon salt
Prick sweet potatoes with a fork in several places. Microwave on high until tender all the way to the center, about 10 to 15 minutes. Alternatively, place in a baking dish and bake at 425 F until tender all the way to the center, about 1 hour.
When cool enough to handle, peel off and discard skin. Transfer the sweet potatoes to a medium microwaveable bowl and mash thoroughly with a potato masher. Add coconut milk, ginger and salt; stir well. Reheat in the microwave for 1 to 2 minutes, or in the oven for 8 to 10 minutes. Garnish with green onion or basil. Serve warm.
You can also cover and refrigerate for up to 3 days. Reheat in the microwave or oven just before serving.
Essentially Lavender
As a massage therapist, I’ve used a variety of essential oils over the years with my clients as well as for myself. Essential oils, also called “essences”, are botanical extracts of various plant materials, and do not only originate from flowers, but from herbs, trees and various other plant material. Essential oils are used in a variety of ways, including the more common aromatherapy method (where the oil is absorbed through the skin) or vaporization (where the essential oil molecules enter the bloodstream via the lungs). However, essential oils are also used medicinally by treating a problematic are (topically) or even taken internally. I use essential oils in all of my massage oil mixtures, formulating the perfect combination for each individual client.
Lavender (Lavandula angustifolia) has a fresh, sweet, floral, herbaceous aroma that is soothing and refreshing. It is by far my favorite essential oil to use. Because it is the most versatile of all essential oils, no home should be without it. Lavender is an adaptogen, and can help the body when adapting to stress or imbalances. It is a great aid for relaxing and winding down before bedtime, yet has balancing properties that can also boost stamina and energy. Therapeutic-grade lavender is highly regarded for skin and beauty. It may also be used to soothe and cleanse common cuts, bruises, and skin irritations. The French scientist René Gattefossé was among the first to discover these properties when he was severely burned in a laboratory explosion. Lavender may also be used to enhance the flavor of foods.
Here’s 15 ways to use lavender essential oil to make your life more calm, balanced, and healthy!
- Aching Muscles
If you’ve spent a back-breaking afternoon in the garden, jump into a lavender bath to soothe aches & pains away. Apply Epsom salts & a few drops of lavender oil to the bath and soak away the tension. - Acne
Lavender is one of the most valuable oils for the treatment of acne, according to aromatherapists. “It inhibits the bacteria that cause the skin infection, helps to rebalance the over-secretion of sebum, which the bacteria thrive on, and reduce scarring”. Add a few drops of lavender oil to a plain cream sold by chemists and use as a moisturizer or cleanser. - Bugs & Bacteria
French laboratory studies in the early 20th century showed that lavender is a powerful antibacterial in dilutions of 5 per cent or less it is lethal to bacteria that cause typhoid, TB & diphtheria. Combined with Lemon Balm, for its clinically tested anti-viral properties. - Burns (minor)
After you have cooled the area by immersing it in running cold water for 5 minutes, gently stroke on neat lavender oil. Pain relief is almost immediate, and burn usually heals without scarring. - Cuts & Wounds
Apply lavender oil to sooth pain, prevent bacterial infection and aid scar-free healing. Apply neat. - Earache
Warm a bottle of lavender oil in hot water for a minute or two, then gently massage a few drops into the skin around the ears and throat. For babies & small children, add 2-3 drops of the warmed oil to a little olive oil and massage in the same way. - Eczema
Stroke infused lavender oil (a few drops of lavender oil & carrier oil) into dry, itchy skin – small children will find this especially comforting or add a few drops of lavender oil to calamine lotion, just remember to shake before use. - Fatigue
Add 5 drops of lavender oil to a hot foot bath and relax while your feet soak in it. The soles of the feet are particularly porous, so lavender reaches your bloodstream very quickly, exerting its stimulating and soothing effects on various systems of your body. - Fevers
For babies or small children, sponge them down very gently with tepid water to which you have added a drop of lavender oil. Take care not to let them get chilled. This works for adults too. - Giddy Spells, Faintness or Palpitations
Make your own smelling salts – sea salt , lavender oil, peppermint oil & basil oil. - Headache
Spray lavender mist (lavender oil and distilled water) around your head. It is highly refreshing and soothing. Alternatively, make a compress of a piece of cause or muslin soaked in icy cold water then sprinkled with a few drops of lavender oil and apply to the forehead, or massage a few drops into the forehead, temples and nape of the neck. - Insomnia
In a number of small studies, elderly psychiatric patients have been shown to sleep better and be more alert during the day when their sleep medication is replaced with lavender oil either dropped on their pillows, or placed in a diffuser on the ward. To help to induce sleep, put 3 or 4 drops of lavender oil on your pillow. For babies, add 1 drop of lavender oil & geranium oil in carrier oil and massage into a babies back or a few drops in their bedtime bath. - Long-Haul Travel
Combine lavender, rosemary, frankincense & sage oils and rub into into your hand luggage. Also, be sure to roll it over your pulse points to help you keep a clear head during those endless hours in the air. - Menstrual & Tummy Cramps
Massage a few drops of lavender oil into your lower abdomen or apply a hot compress onto the area, which a little lavender oil has been sprinkled. - Moths & Mosquitoes
These annoying little insects all hate the smell of lavender. To prevent bites, splash yourself with lavender mist (lavender oil and distilled water) before you go out at sunset or to bed, put 3-4 drops of oil on your pillow or soak cotton ball in the oil and leave it on a saucer in front of the window. Lavender oil is also a terrific remedy for insect bites, soothing itching & inflammation: dab it on to them neat as soon as possible. To keep moths off your clothes, hand lavender bags on you coat hangers or keep them among your sweaters and refresh them with a drop or two of lavender oil from time to time. - Scabie
This infestation by a tiny mite burrowing into your skin causes intense itching. Rub the whole body with neat lavender oil, then following every day until better with a mixture of lavender oil and alcohol. Change and wash bedding and clothes and sprinkle lavender oil on the mattress. - Shingles
Combine a mix of lavender oil with, analgesic, antiviral & scar preventing essential oils neat or on compresses on the agonizing lesions of shingles. It usually produces a cure within 5-8 days. - Sinusitis
Lavender is one of several essential oils that aromatherapists recommend for inhalations to relieve sinusitis, add two drops of lavender & thyme oil to a bowl of near-steaming water and inhale slowly and deeply, with a towel over your head & bowl. - Stress & Anxiety
Keep a small spray bottle of lavender mist (lavender oil and distilled water) – handy to spray on your face during the day, or apply lavender oil neat to your temples. - Sunburn
Spray lavender mist (lavender oil and distilled water) directly onto the skin or Add 8 drops of lavender oil and 4 drops of peppermint oil to a teaspoon of jojoba oil. Pour it into a cool-to-lukewarm bath and soak for 10 minutes.


 1. HEALTH
 2. COMPASSION
 3. ENVIRONMENT
 4. NATURAL


